fresco 🠖 using fresco
Using Fresco
This guide will walk you through the basic workflow for using Fresco to conduct your study.
Fresco is designed to be used in conjunction with Architect for designing interview protocols. If you haven't already, you should design your protocol in Architect before proceeding.
Basic workflow
Using Fresco will be familiar to anyone who has used the desktop applications, with the significant advantage that you can now conduct all protocol, participant, and data management through a web-based dashboard.
The basic workflow for using Fresco is as follows:
- Deploy Fresco: Deploy your own instance of Fresco (more on this in the deployment guide).
- Upload protocols: Upload one or more Network Canvas protocols created in Architect to Fresco.
- Add participants: Add participants to your study, either individually or in bulk. Alternatively, use the anonymous recruitment feature to allow participants to self-enroll in the study.
- Conduct interviews: Share either the unique participant URL or the anonymous recruitment URL with participants to allow them to complete the interview on their own device.
- Monitor progress: Monitor the progress of your study using the dashboard.
- Export data: Export data from the interviews page once your data collection is complete.
We will now walk through each of these steps in more detail.
Deployment
Fresco is designed to be deployed on your own server(s) and infrastructure. This ensures you have full control over the data collected in your study and can comply with any relevant data protection regulations or Institutional Review Board (IRB) requirements.
For many researchers, using our basic deployment guide to deploy to the free Netlify plan will be sufficient. However, if you have specific requirements around data security, privacy, or compliance, you may need to deploy Fresco to your own server, or to specialist services.
If you are unable to deploy Fresco yourself, your university may be able to host a compliant version of Fresco for you. Please contact your IT department or research support office for more information, and refer them to our advanced deployment guide for more information on the requirements for hosting Fresco.
Uploading protocols
Once you have deployed Fresco and have access to your dashboard, we can begin by uploading one or more protocols for your study.
In Fresco you can upload as many protocols as you would like (within the resource limits of your hosting). This allows you to have multiple protocols for different studies, or to have multiple versions of the same protocol for different groups of participants.
However, we recommend not hosting different studies on the same instance of Fresco, as this can lead to confusion and potential data leakage. If you are conducting multiple studies, our suggestion is that you deploy a separate instance of Fresco for each study.
To upload a protocol
- Navigate to the protocols page in the dashboard.
- Click the Upload protocol button.
- Select the
.netcanvasfile that you exported from Architect. - Click Upload.
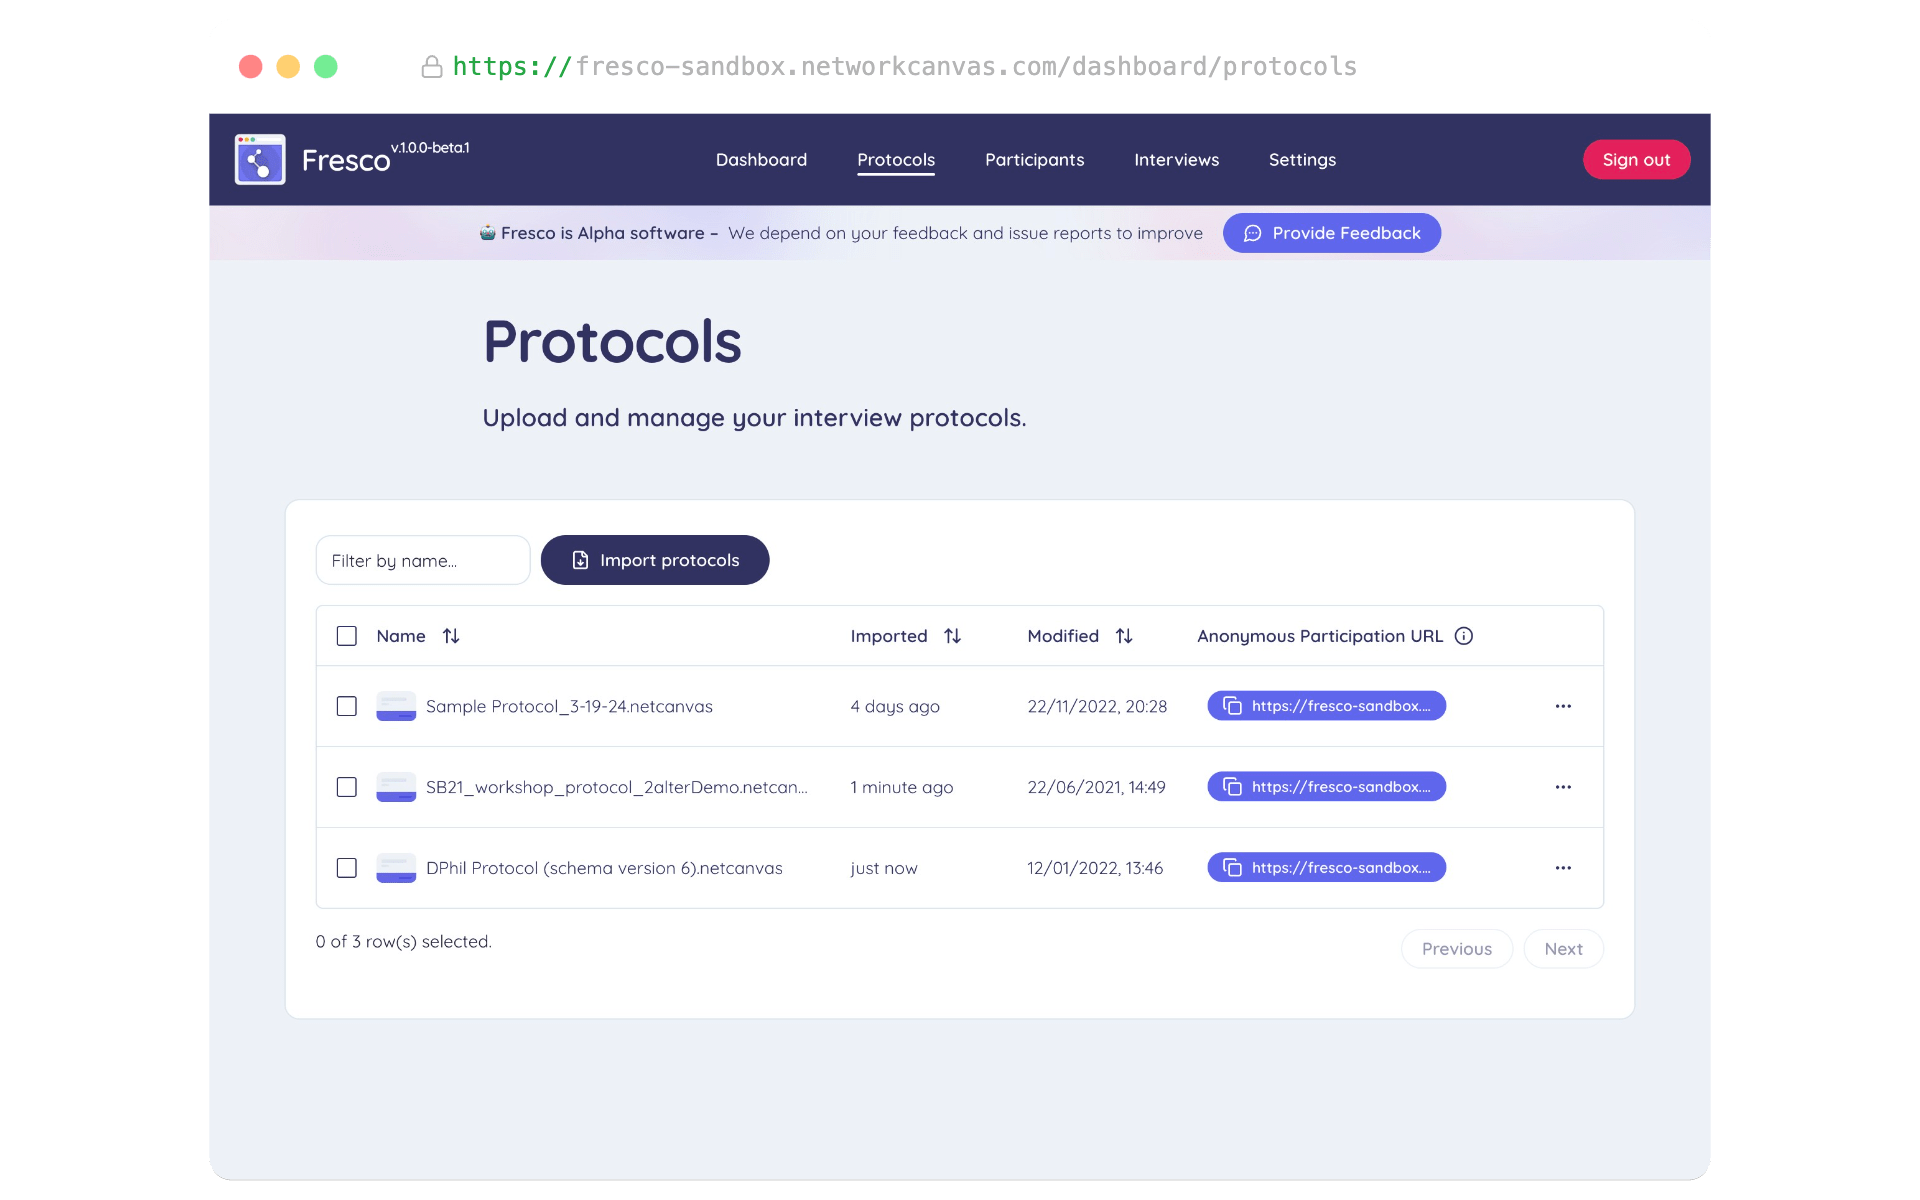
Fresco will then validate and upload your protocol. If it contains any assets (images, audio, video, or network files), Fresco will upload these to the UploadThing service and link them to your protocol.
Once the process is finished, you will see your protocol listed on the protocols page. You can click on the protocol to view its details, and to see the unique URL that you will share with participants to conduct interviews.
Participants
In order to conduct your study, you will need to decide on a recruitment strategy and to define who is allowed to participate. Fresco supports two approaches:
- Adding known participants, either individually or in bulk.
- Allowing participants to self-enroll anonymously.
These approaches are not mutually exclusive, and can be used in combination. For example, you could have an initial "wave" of known participants which you add to Fresco manually, and then ask those participants to share the anonymous recruitment URL with anyone else they think might be interested in participating.
Which approach you choose will depend on the specifics of your study, and the resources you have available for recruitment.
Regardless of the approach, Fresco defines all participants by their participant identifier and an optional label. For known participants, you can provide the participant identifier (which is useful for linking responses to external data sources), or Fresco can generate one at random. If you enable anonymous recruitment, Fresco assigns participants a random identifier when they begin an interview.
Participant labels are an optional attribute you can use to provide a human-readable label for the participant. This field is not exposed to participants and can store a name or an internal project label for the participant.
Adding participants manually
The simplest method to add one or more "known participants" is manually via the dashboard. This approach is useful when you have a small number of participants.
To add a participant manually:
- Navigate to the participants page in the dashboard.
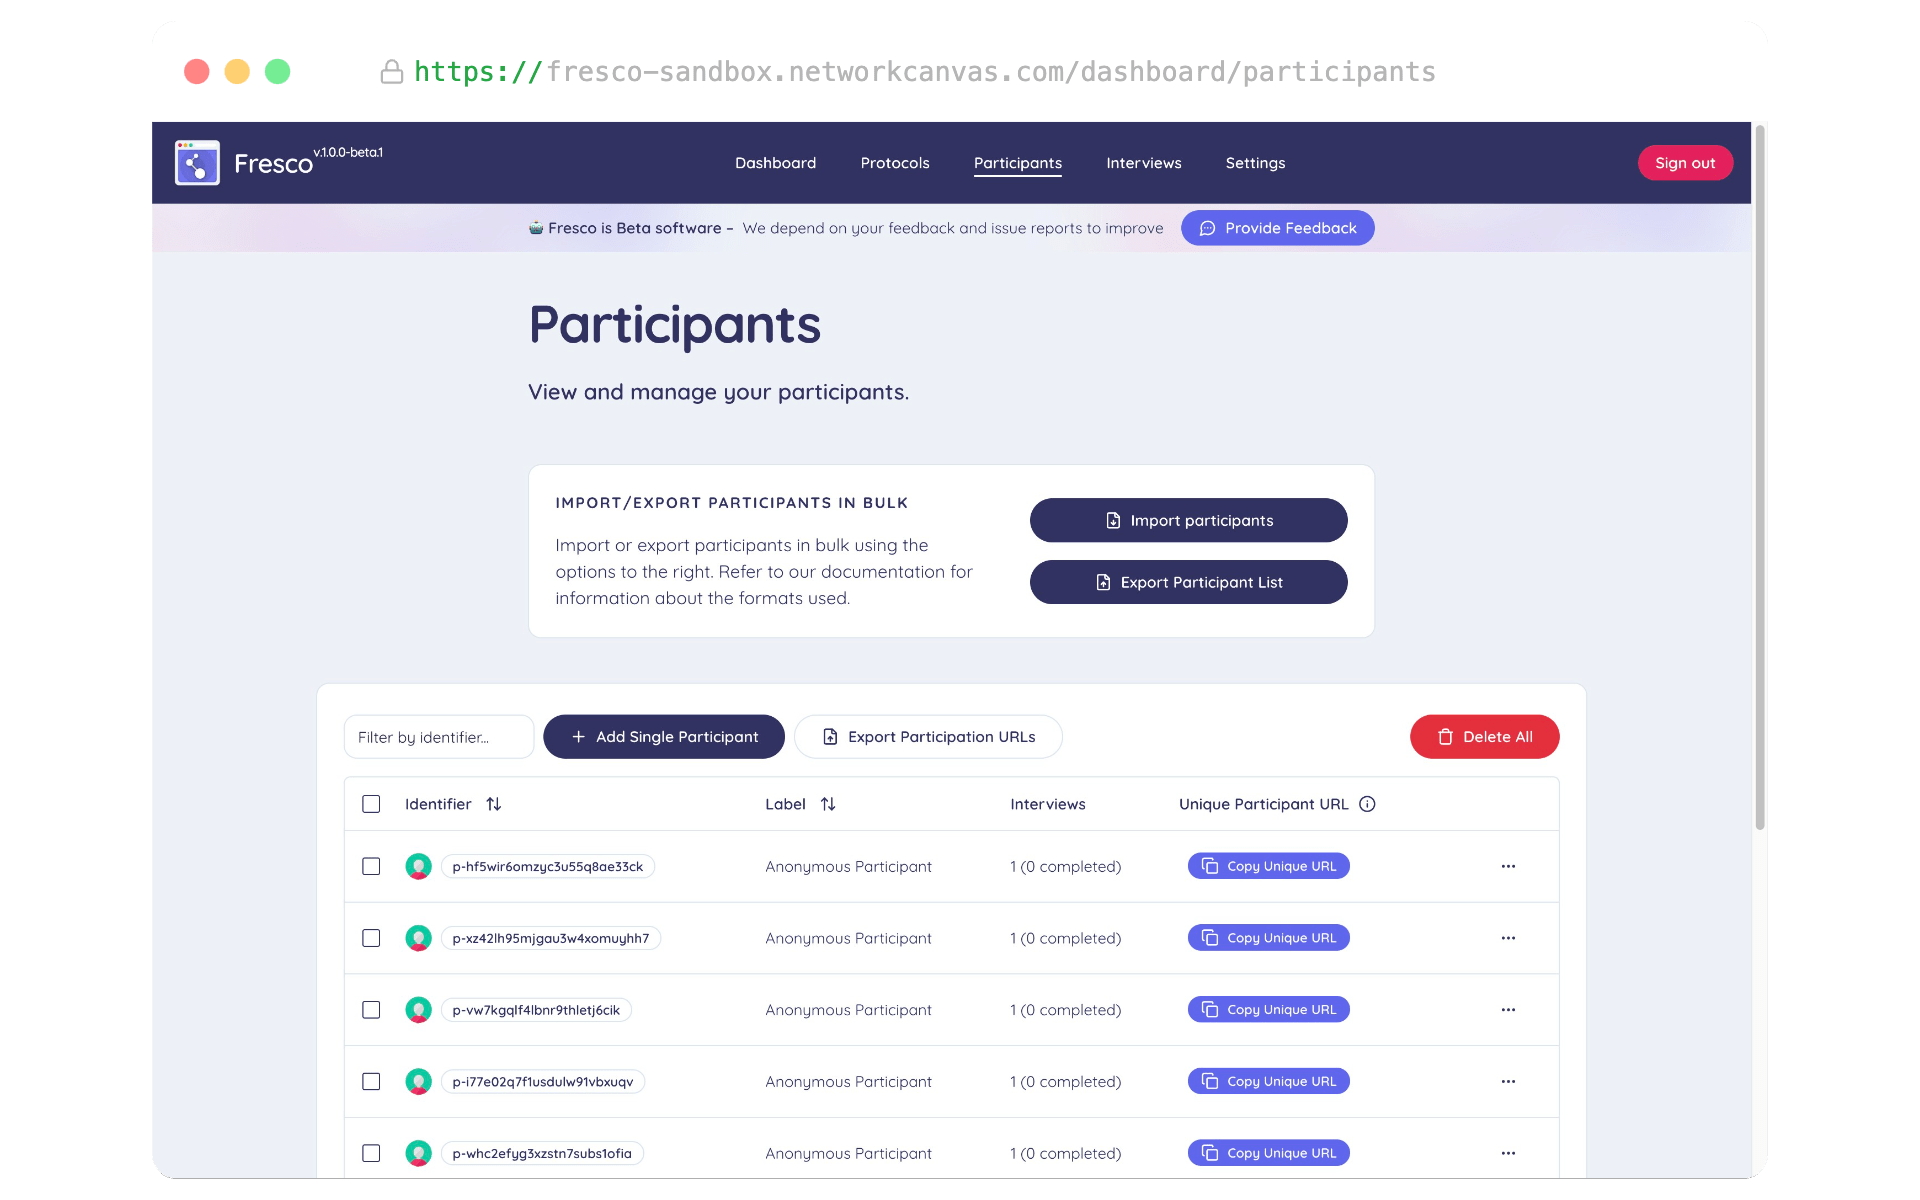
The participants page in the dashboard. - Click the Add Single Participant button.

Adding a single participant - Enter a participant identifier, or click the Generate button to have one generated for you at random.
- Optionally, enter a participant label.
- Click Submit.
Your participant will immediately appear in the participants list.
Adding participants in bulk via CSV import
Adding participants in bulk is useful when you have a large number of participants to add to the study. You can do this by uploading a CSV file containing the participant data.
Once you have created your CSV file, you can upload it to Fresco as follows:
- Navigate to the participants page in the dashboard.
- Click the Import participants button.
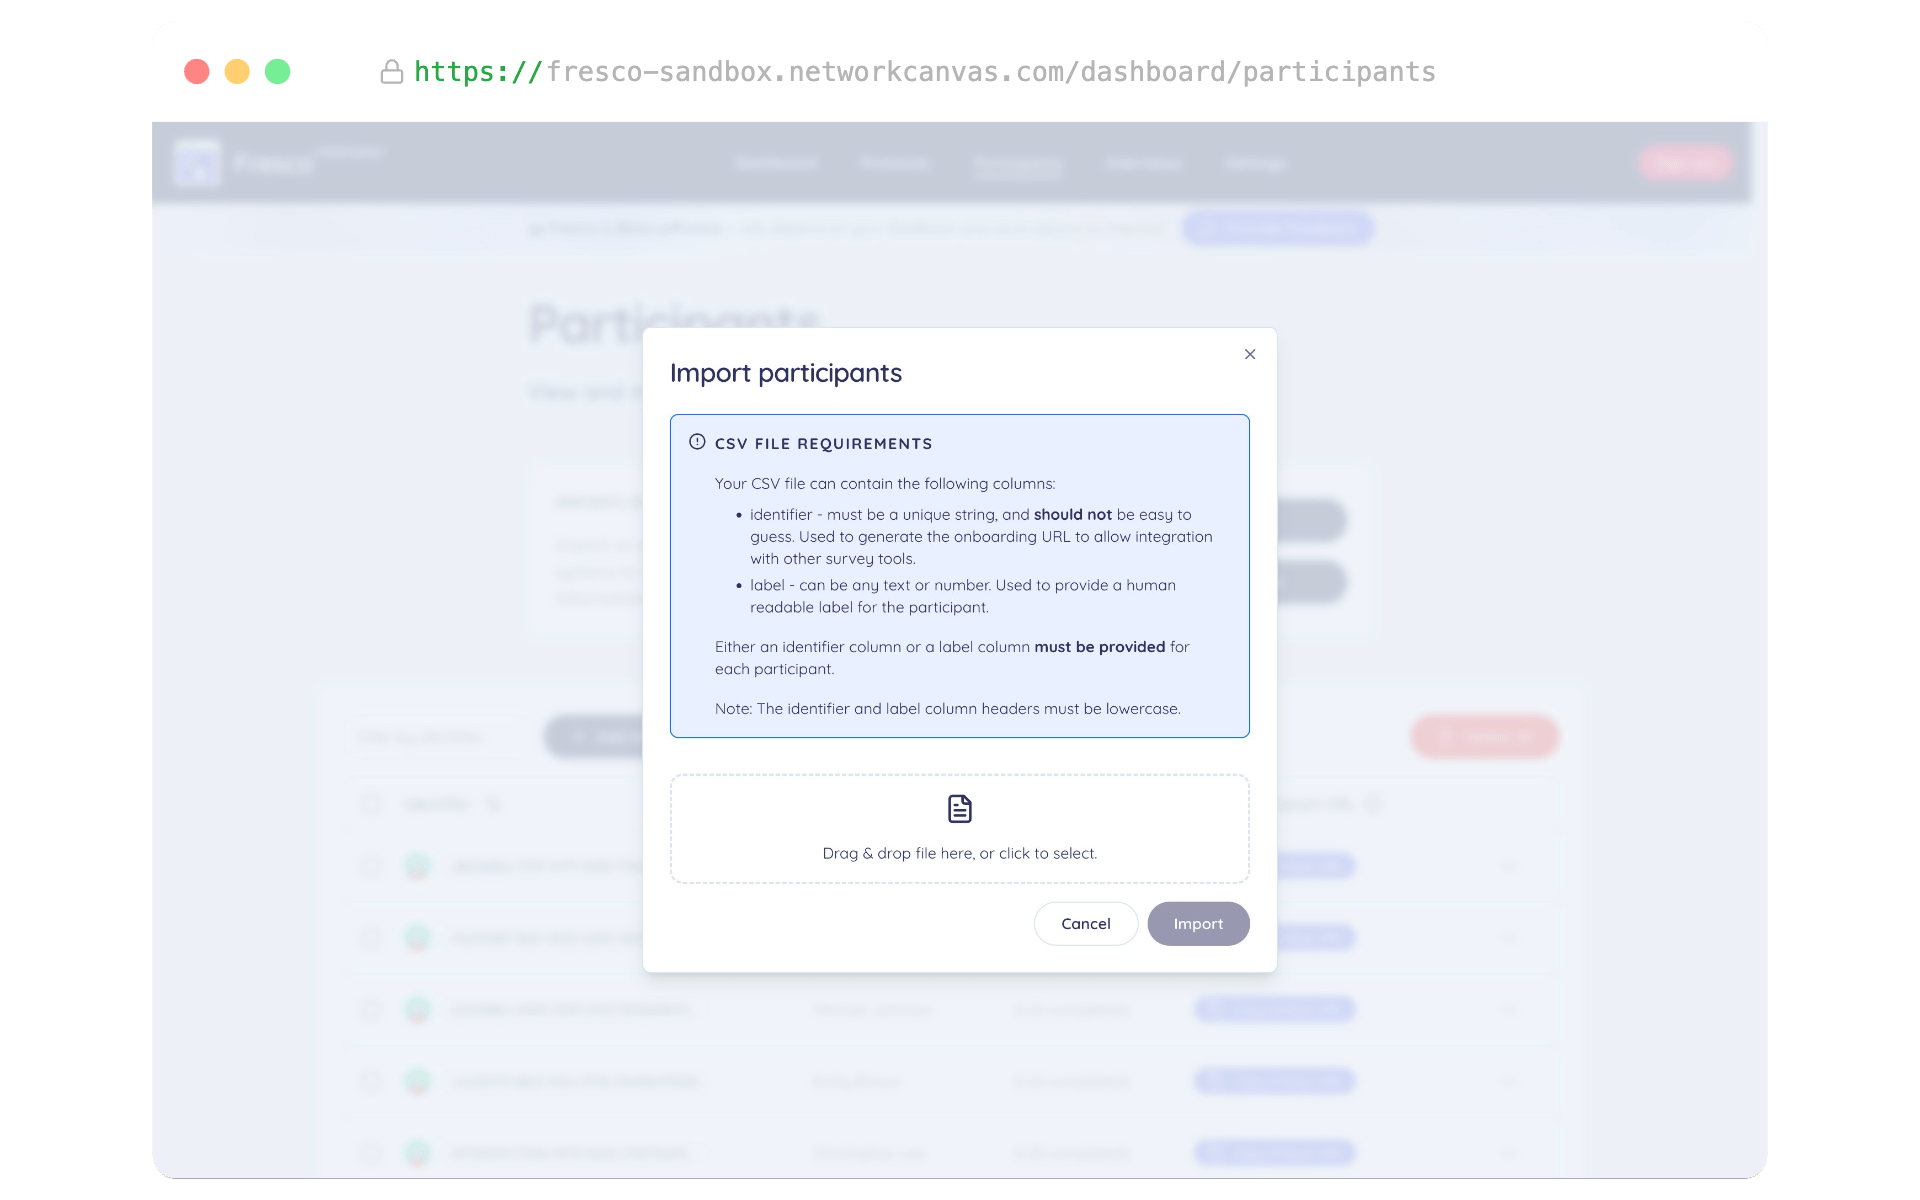
The CSV import dialog - Upload your CSV file.
- Click Submit.
Your participants will immediately appear in the participants list.
Anonymous recruitment
Anonymous recruitment mode allows participants to self-enroll in the study using a unique URL. You can generate this URL for each protocol and share it with participants. When participants visit the URL, Fresco assigns them a random participant identifier and allows them to complete an interview. This method is useful when you do not have a list of known participants or when you want to allow participants to share the study with others.
Enabling anonymous recruitment
- Navigate to the settings page in the dashboard.
- Toggle the Anonymous Recruitment switch.

Once enabled, a warning message will be visible on the main dashboard page to remind you that anonymous recruitment is active.
Conducting interviews
Once you have uploaded your protocol and optionally added participants to the study, you can begin conducting interviews.
In Fresco, interviews are conducted by participants on their own devices. Participants can begin an interview by following a URL that you provide them.
Unique participant URLs
Unique participant URLs are unique URLs you can generate for each participant per protocol and share with the participant to allow them to complete an interview. These URLs take the participant directly to the interview for the specified protocol and link their responses to their participant identifier.
To share unique participant URLs with participants, you can either copy each URL individually or export a CSV file containing all the URLs for a given protocol.
Manually copying a unique participant URL
- Navigate to the participants page in the dashboard.
- Click the Copy Unique URL button for the participant you wish to generate a URL for.
- Select the protocol you wish to conduct the interview for from the dropdown.
- The URL will be copied to your clipboard. You can now share this URL with the participant.
Exporting a CSV of unique participant URLs
- Navigate to the participants page in the dashboard.
- Click the Export Participant URLs button.
- Select the protocol you wish to generate URLs for from the dropdown.
- Optionally, select the participants you wish to generate URLs for. This option defaults to all participants.
- Click the Export Participant URLs button.
The CSV file will contain a row for each participant, with columns for the participant identifier, participant label, and the unique URL for the specified protocol. You can use this file to distribute the URLs to participants via email, SMS, or other methods.
Anonymous participant URLs
If you enable anonymous recruitment, participants can self-enroll in the study using an anonymous participant URL. This URL is not unique to the participant. You can share the same URL with multiple participants to allow them to complete an interview without needing to be added to the study manually.
To generate an anonymous participant URL:
- Navigate to the protocols page in the dashboard.
- Click on the Anonymous Participant URL button for the protocol you wish to recruit participants for.
- The URL will be copied to your clipboard and will be in the following format:
https://yourstudy.com/onboard/{protocolUniqueID}
You can now share this URL with participants to allow them to self-enroll in the study.
Limit interviews
You may want to limit the number of interviews that a participant can complete for a given protocol. For this reason, Fresco includes this as an option you can enable on the settings page.
If you enable this option, each participant will only be able to submit a single completed interview for each protocol (although they may have multiple incomplete interviews). Once a participant has completed an interview, attempting to start a new interview or to resume any other in-progress interview will be prevented. This applies to both unique participant URLs and anonymous participant URLs.
To enable this feature:
- Navigate to the settings page in the dashboard.
- Toggle the Limit Interviews switch to on.
Monitoring progress
Once you have sent out URLs to participants and they begin to complete interviews, you can monitor the progress of those interviews using the interviews page in the dashboard and the main dashboard activity feed.
The interviews page provides an overview of all interviews in the study, including the participant identifier, protocol name, start date, last updated date, and interview progress. From this page you can also export data from the interviews.
The dashboard activity feed also provides a way to monitor the progress of your study and summarizes the most recent activity within Fresco. This includes installed protocols, added participants, started and completed interviews, and exported data.
Generate a CSV of incomplete URLs
You can generate a CSV file of incomplete interview URLs in bulk for multiple participants by protocol. This can be useful for sending reminders to participants who have not yet completed their interview.
- Navigate to the interviews page in the dashboard.
- Click on the Export Incomplete URLs button.
- Select the protocol you wish to generate URLs for from the dropdown.
- Click the Export Incomplete URLs button.
Exporting data
Once participants have completed interviews, you can export the data from the interviews page for analysis in your preferred external software. You can also view the export status of each interview from this page.
To export selected interviews:
- Navigate to the interviews page in the dashboard.
- Select the checkboxes next to the interviews you wish to export.
- Click the Export selected button at the bottom of the table.
- Confirm the file types and export options that you wish to use.
- Click Start export process.
To export all interviews:
- Navigate to the interviews page in the dashboard.
- Click the Export Interview Data button.
- Select Export all interviews from the dropdown.
- Confirm the file types and export options that you wish to use.
- Click Start export process.
To export all unexported interviews:
- Navigate to the interviews page in the dashboard.
- Click the Export Interview Data button.
- Select Export all unexported interviews from the dropdown.
- Confirm the file types and export options that you wish to use.
- Click Start export process.
File types
Fresco will prompt you to choose file types for the export. The file types are identical to those found in Interviewer. The two options are:
- CSV. A common format for representing network data. This format is readable as a table (or series of tables) in Excel, LibreOffice, Keynote, and other tabular programs. The CSV version also complies with the
egorpackage standard. Selecting this option will output multiple files, including node and edge lists for each type, and an ego attribute list that also includes session metadata:- Ego attribute list: This file will have one row per ego, with ego-level variables session metadata. The filename will be in the format
caseID_sessionUUID_ego.csv. - Alter attribute list: This file will have one row per alter (i.e. per nominated node). All alters have their own unique ID, as well as an automatically incrementing ID that is only consistent on a per-export basis. The filename will be in the format
caseID_sessionUUID_alterType.csv. - Edge attribute list: This will have one row per relationship, with columns representing edge attributes. Each row will have a key to link to ego (
networkCanvasEgoUUID), as well as source and target columns that reference both the UUID and the automatically incrementing export ID. The filename will be in the formatcaseID_sessionUUID_edgeType.csv.
- Ego attribute list: This file will have one row per ego, with ego-level variables session metadata. The filename will be in the format
- GraphML. An XML based open standard for representing graph data, that is compatible with many social network analysis programs including UCINET, Gephi, NodeXL, Pajek, Visone, and ORA. The filename will be in the format
caseID_sessionUUID.graphml.
Which file type you should choose depends largely on the needs of your analysis tools. We recommend exporting data in both formats and experimenting with the data you receive to ensure that it meets your needs.
Export options
You can configure a variety of specialized export options that will impact the data you receive in various ways. You can leave these options at their default values unless you know that you need to change them.
Use screen layout coordinates
Position data from layout variables used on the Sociogram interface in Interviewer is stored on nodes as normalized x/y coordinates, with the origin in the top left of the screen. This allows you to later visualize these layouts on a canvas of arbitrary size, and to compare layouts that were created on screens with different proportions.